【Kivy】AnchorLayoutの使い方
こんにちは、にわこまです。
今回は、AnchorLayoutの使い方について紹介します。「どのような場面で使うのか?」や「他のlayoutと何が違うのか?」を紹介できたらなと思っています。
誤字脱字など、何かございましたらご連絡お願いいたします。
スポンサードサーチ
AnchorLayout
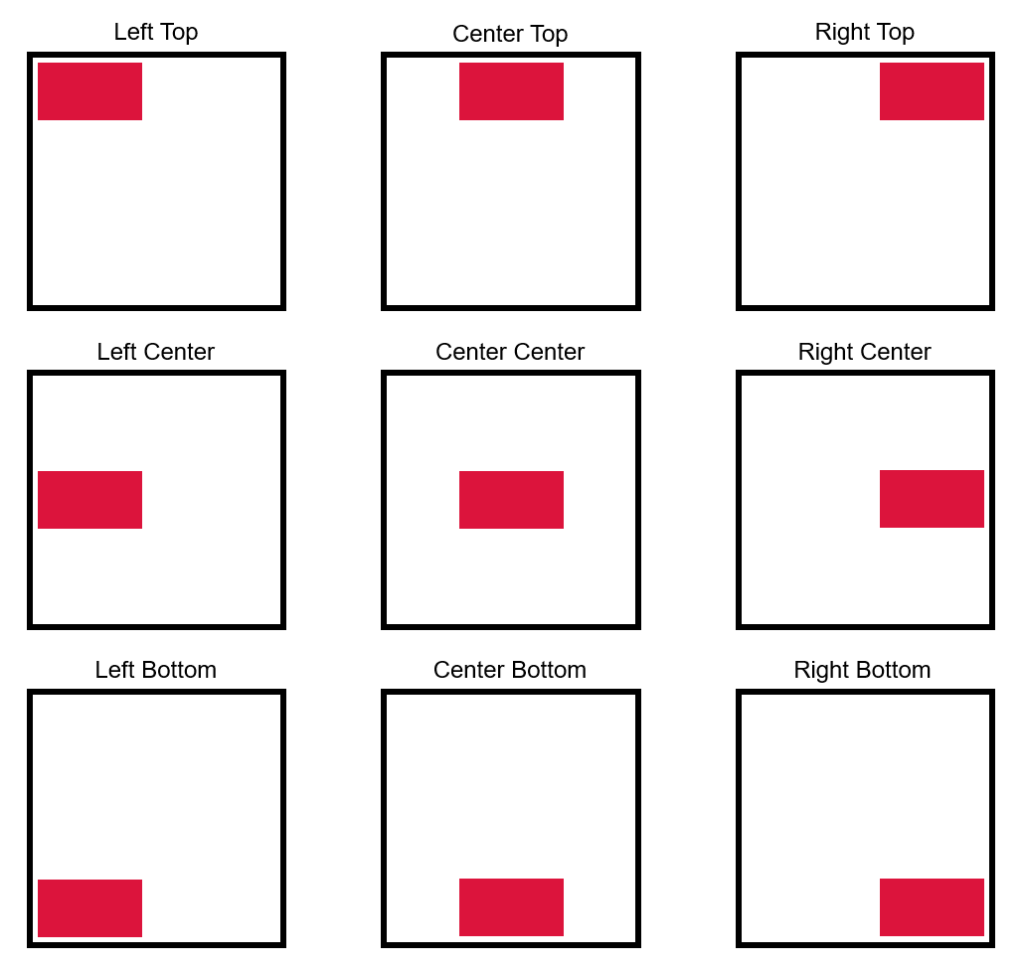
AnchroLayoutは、子ウィジェットの位置を固定することができます。
位置を固定するとは、左上(Left Top)、上(Center Top)、右上(Right Top)、左(Left Center)、中央(Center Center)、右(Right Center)、左下(Left Bottom)、下(Center Bottom)、右下(Right Bottom)のどれかにくっつけておけるということです。
使い方
AnchorLayoutを使う時は、「anchor_x」と「anchor_y」を指定します。それぞれ、3種類から指定します。
anchor_xは、「left」「center」「right」
anchor_yは、「top」「center」「bottom」
私は、中央にボタンなどを固定したいことが多いため、「anchor_x=’center’, anchor_y=’center’」と指定することが多いです。
サンプル
# -*- coding: utf-8 -*-
<MyAnchor>:
    canvas.before:
        Color:
            rgb: [0.18, 0.54, 0.34]
        Rectangle:
            pos: self.pos
            size: self.size
    pos_hint: {'center_x':0.5, 'center_y':0.5}
    size_hint: [0.8, 0.8]
# -*- coding: utf-8 -*-
from kivy.app import App
from kivy.uix.anchorlayout import AnchorLayout
from kivy.uix.button import Button
from kivy.lang import Builder
Builder.load_file('SampleAnchor.kv')
class MyAnchor(AnchorLayout):
def __init__(self, **kwargs):
super(MyAnchor, self).__init__(**kwargs)
anchor_text = 'anchor_x = ' + self.anchor_x + '\n' + 'anchor_y = ' + self.anchor_y
self.btn = Button(text=anchor_text, size_hint=[0.4, 0.2], font_size=24)
self.add_widget(self.btn)
class SampleAnchorApp(App):
def build(self):
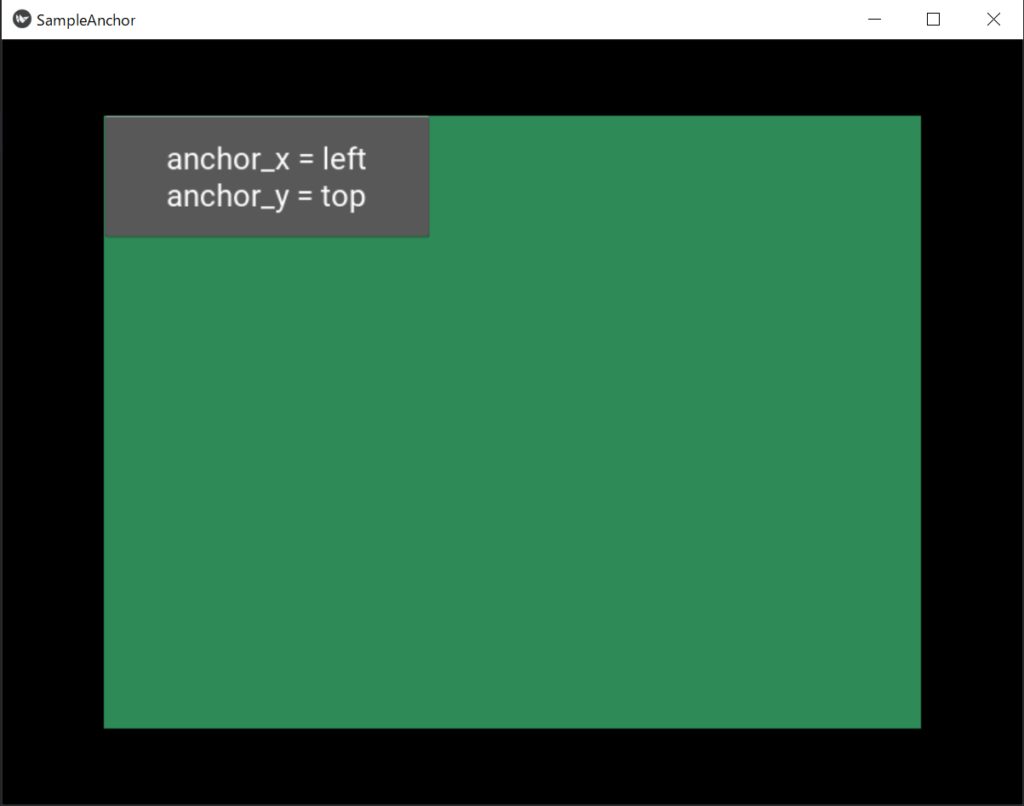
layout = MyAnchor(anchor_x='left', anchor_y='top') # 左上
#layout = MyAnchor(anchor_x='center', anchor_y='top') # 上
#layout = MyAnchor(anchor_x='right', anchor_y='top') # 右上
#layout = MyAnchor(anchor_x='left', anchor_y='center') # 左
#layout = MyAnchor(anchor_x='center', anchor_y='center') # 中央
#layout = MyAnchor(anchor_x='right', anchor_y='center') # 右
#layout = MyAnchor(anchor_x='left', anchor_y='bottom') # 左下
#layout = MyAnchor(anchor_x='center', anchor_y='bottom') # 下
#layout = MyAnchor(anchor_x='right', anchor_y='bottom') # 右下
return layout
pass
if __name__ == '__main__':
SampleAnchorApp().run()
左上に固定した、AnchorLayoutを示します。
まとめ
今回は、AnchorLayoutについて紹介しました。他のLayoutと違って子ウィジェットを固定することができます。
AnchorLayoutを使う時は、「anchor_x」と「anchor_y」を指定します。
例:layout = AnchorLayout(anchor_x=’left’, anchor_y=’top’)
以下に、今回使用したサンプルコードとちょっとしたアプリケーションを示します。実際に動かしてみたい方はダウンロードしてみてください。
最後までお読みいただきありがとうございます。
スポンサードサーチ
