Kivyでオセロ開発Part14
こんにちは、にわこまです。
今回は、Kivy Languageを使ったオセロアプリケーションを完成させます。具体的には、プレイ画面の右側に、得点板や手番やタイトルに戻るボタンを作成します。
誤字脱字など、何かございましたらご連絡お願いいたします。
スポンサードサーチ
Kivyでオセロ開発Part14
今回のシリーズは、Kivyを使ってオセロを開発することを目的としています。
今回のシリーズの主な内容
1.コマンドプロンプト上で遊べるオセロの開発
2.kivyを使ってオセロを開発(Kivy Languageは使用しない)
3.kivyを使ってオセロを開発(Kivy Languageを使用する)←今ココ
目的を達成するためにも、まずはコマンドプロンプト上で遊ぶことができるオセロを開発します。
次に、kivyを使ってオセロを開発します。しかし、Kivy Languageは使用しません。つまり、pythonだけをつかってオセロアプリケーションを開発します。
最後に、Kivy Languageとpythonを使ってオセロアプリケーションを開発します。
今回は
今回は、オセロアプリケーションを完成させます。具体的には、プレイ画面の右側に得点板と手番とタイトルに戻るボタンを作成します。
得点板
オセロをプレイ中に、今どちらの方が勝っているのか確認するためのものです。othello_beta.pyでは、CountWidgetクラスで表していたものです。
得点板のデザインと諸設定です。othello_gamma.kvに以下のコードを追記します。
# 上記省略

<GridLabel@Label>:
    color: [1, 1, 1, 1]
    font_size: 26
    bold: True

<PlayWidget@BoxLayout>:
    AnchorLayout:
        anchor_x: 'center'
        anchor_y: 'center'
        size_hint_x: 2
        FieldWidget:
            size: [800, 800]
            size_hint: [None, None]
            on_pos: self.drawField()
            on_size: self.drawField()
    BoxLayout:
        orientation: 'vertical'
        AnchorLayout:
            anchor_x: 'center'
            anchor_y: 'center'
            GridLayout:
                canvas.before:
                    Color:
                        rgb: [0.281, 0.363, 0.246]
                    Rectangle:
                        pos: self.pos
                        size: self.size
                    Color:
                        rgb: [0, 0, 0]
                    Line:
                        rectangle: [self.x, self.y, self.width, self.height]
                        width: 3
                    Line:
                        points: [self.width/2 + self.x, self.y,  self.width/2 + self.x, self.height + self.y]
                        width: 3
                    Line:
                        points: [self.x, self.height/3*2 + self.y,  self.width + self.x, self.height/3*2 + self.y]
                        width: 3
                    Line:
                        points: [self.x, self.height/3 + self.y,  self.width + self.x, self.height/3 + self.y]
                        width: 3
                rols: 3
                cols: 2
                size_hint: [0.8, 0.6]
                GridLabel:
                    id: BlackTurn
                GridLabel:
                    id: WhiteTurn
                GridLabel:
                    text: 'Black'
                GridLabel:
                    text: 'White'
                GridLabel:
                    id: clb
                GridLabel:
                    id: clw
得点を代入するためのソースコードです。othello_gamma.pyに以下のコードを追記します。
# 上記省略

class FieldWidget(Widget):
    def drawField(self):
        # 省略
    def drawRowLine(self):
        # 省略
    def drawColLine(self):
        # 省略
    def drawStone(self):
        # 省略
    def on_touch_down(self, touch):
        xpos = int((touch.x - self.x) / (self.width / 8))
        ypos = int(8 - (touch.y - self.y) / (self.height / 8))
        if(othello_alpha.Turn == othello_alpha.playerStone):
            mypos = (ypos, xpos)
            if(len(player.getPossibleLocation()) == 0):
                othello_alpha.Turn = othello_alpha.computerStone
            else:
                if(player.confPos(mypos)):
                    player.updateField(mypos)
                    self.drawField()
                    othello_alpha.Turn = othello_alpha.computerStone
            pass
        elif(othello_alpha.Turn == othello_alpha.computerStone):
            mypos = comp.electRandom()
            if(mypos != None):
                comp.updateField(mypos)
                self.drawField()
            othello_alpha.Turn = othello_alpha.playerStone
        else:
            pass
        self.parent.parent.ids.clb.text = str(len(list(zip(*np.where(othello_alpha.field == 1)))))
        self.parent.parent.ids.clw.text = str(len(list(zip(*np.where(othello_alpha.field == 2)))))
    pass

class SelectTurn(FloatLayout):
    # 省略

class RootWidget(FloatLayout):
    def gotoTitle(self):
        self.clear_widgets()
        self.add_widget(Factory.TitleWidget())
    def gotoSelectTurn(self):
        self.clear_widgets()
        self.add_widget(Factory.SelectTurn())
    def gotoPlayDisplay(self):
        pw = Factory.PlayWidget()
        pw.ids.clb.text = '2'
        pw.ids.clw.text = '2'
        pw.ids.BlackTurn.text = 'You' if(othello_alpha.playerStone == 1) else 'Computer'
        pw.ids.WhiteTurn.text = 'You' if(othello_alpha.playerStone == 2) else 'Computer'
        global player
        global comp
        player = Player(othello_alpha.playerStone, othello_alpha.computerStone)
        comp = Computer(othello_alpha.computerStone, othello_alpha.playerStone)
        self.clear_widgets()
        self.add_widget(pw)
    pass

# 下記省略
コードの解説
kvファイルの3行目~6行目の「GridLabel」は、得点板に表示するLabelの諸設定です。
20行目~58行目は、得点板の諸設定です。
20行目~22行目の「AnchorLayout」は、得点板を真ん中に表示させるためのものです。そのため、「anchor_x」と「anchor_y」をどちらとも「center」に設定しています。
24行目~43行目は、得点板の背景色と線を描画するためのものです。
44行目の「rows」と45行目の「cols」により、GridLayoutが3行2列になるように設定しています。
46行目の「size_hint: [0.8, 0.6]」は、比率によってサイズを設定しています。
47行目~50行目は、先手と後手の手番を表示するラベルです。pythonファイルから呼び出すためidを設定しています。
51行目~54行目は、「Black」と「White」を表示するラベルです。textにそれぞれ文字列を設定しています。
55行目~58行目は、黒石と白石の数を表示するラベルです。pythonファイルから呼び出すためidを設定しています。
pythonコードの33、34行目は、黒石と白石の数を得点板の所定のラベルに代入しています。
「self.parent.parent.ids.clb.text」について説明します。
「self.parent」は、FieldWidgetの親ウィジェットを指しています。つまりAnchorLayoutです。
「self.parent.parent」は、PlayWidgetを指しています。
「self.parent.parent.ids」は、self.parent.parentの子ウィジェットに含まれるすべてのidとそのクラスを辞書型で取得することができます。
「self.parent.parent.ids.id名」は、id名のクラスを呼び出すことができます。
49、50行目では、黒石と白石の数の初期値を設定しています。
51、52行目では、黒石の手番と白石の手番をkvファイルの所定のLabelに代入しています。
動作確認
得点板が正しく表示されるか、動作確認を行います。コマンドプロンプトを開き、othello_gamma.pyを保存したフォルダまで移動します。
移動したら以下のコマンドを入力し、アプリケーションを実行します。
python othello_gamma.py
以下のように表示されていることを確認します。また、オセロを進めるごとに石の数が変化することも確認します。

以上で動作確認は完了です。
スポンサードサーチ
手番
現在どちらの手番なのかを示すためのものです。othello_beta.pyでは、TurnLabelとして表現していました。
手番を表示するレイアウトのソースコードです。othello_gamma.kvに以下のコードを追記します。
# 上記省略

<PlayWidget@BoxLayout>:
    AnchorLayout:
        anchor_x: 'center'
        anchor_y: 'center'
        size_hint_x: 2
        FieldWidget:
            size: [800, 800]
            size_hint: [None, None]
            on_pos: self.drawField()
            on_size: self.drawField()
    BoxLayout:
        orientation: 'vertical'
        size_hint_x: 1
        AnchorLayout:
            anchor_x: 'center'
            anchor_y: 'center'
            GridLayout:
                canvas.before:
                    Color:
                        rgb: [0.281, 0.363, 0.246]
                    Rectangle:
                        pos: self.pos
                        size: self.size
                    Color:
                        rgb: [0, 0, 0]
                    Line:
                        rectangle: [self.x, self.y, self.width, self.height]
                        width: 3
                    Line:
                        points: [self.width/2 + self.x, self.y,  self.width/2 + self.x, self.height + self.y]
                        width: 3
                    Line:
                        points: [self.x, self.height/3*2 + self.y,  self.width + self.x, self.height/3*2 + self.y]
                        width: 3
                    Line:
                        points: [self.x, self.height/3 + self.y,  self.width + self.x, self.height/3 + self.y]
                        width: 3
                rols: 3
                cols: 2
                size_hint: [0.8, 0.6]
                GridLabel:
                    id: BlackTurn
                GridLabel:
                    id: WhiteTurn
                GridLabel:
                    text: 'Black'
                GridLabel:
                    text: 'White'
                GridLabel:
                    id: clb
                GridLabel:
                    id: clw
        Label:
            id: TurnLabel
            bold: True
            color: [0, 0, 0, 1]
            font_size: 26
            halign: 'left'
            valign: 'middle'
            text_size: [self.width*0.8, 50]
手番をkvファイルの所定のラベルに代入するためのソースコードです。othello_gamma.pyに以下のコードを追記します。
# 上記省略

class FieldWidget(Widget):
    def drawField(self):
        # 省略
    def drawRowLine(self):
        # 省略
    def drawColLine(self):
        # 省略
    def drawStone(self):
        # 省略
    def on_touch_down(self, touch):
        xpos = int((touch.x - self.x) / (self.width / 8))
        ypos = int(8 - (touch.y - self.y) / (self.height / 8))
        if(othello_alpha.Turn == othello_alpha.playerStone):
            mypos = (ypos, xpos)
            if(len(player.getPossibleLocation()) == 0):
                othello_alpha.Turn = othello_alpha.computerStone
                self.parent.parent.ids.TurnLabel.text = 'Turn : Computer'
            else:
                if(player.confPos(mypos)):
                    player.updateField(mypos)
                    self.drawField()
                    othello_alpha.Turn = othello_alpha.computerStone
                    self.parent.parent.ids.TurnLabel.text = 'Turn : Computer'
            pass
        elif(othello_alpha.Turn == othello_alpha.computerStone):
            mypos = comp.electRandom()
            if(mypos != None):
                comp.updateField(mypos)
                self.drawField()
            othello_alpha.Turn = othello_alpha.playerStone
            self.parent.parent.ids.TurnLabel.text = 'Turn : You'
        self.parent.parent.ids.clb.text = str(len(list(zip(*np.where(othello_alpha.field == 1)))))
        self.parent.parent.ids.clw.text = str(len(list(zip(*np.where(othello_alpha.field == 2)))))
        if(len(player.getPossibleLocation()) == 0 and len(comp.getPossibleLocation()) == 0):
            self.parent.parent.ids.TurnLabel.text = othello_alpha.confResult()
    pass

class SelectTurn(FloatLayout):
    # 省略

class RootWidget(FloatLayout):
    def gotoTitle(self):
        self.clear_widgets()
        self.add_widget(Factory.TitleWidget())
    def gotoSelectTurn(self):
        self.clear_widgets()
        self.add_widget(Factory.SelectTurn())
    def gotoPlayDisplay(self):
        pw = Factory.PlayWidget()
        pw.ids.clb.text = '2'
        pw.ids.clw.text = '2'
        pw.ids.BlackTurn.text = 'You' if(othello_alpha.playerStone == 1) else 'Computer'
        pw.ids.WhiteTurn.text = 'You' if(othello_alpha.playerStone == 2) else 'Computer'
        pw.ids.TurnLabel.text = 'Turn : ' + pw.ids.BlackTurn.text
        global player
        global comp
        player = Player(othello_alpha.playerStone, othello_alpha.computerStone)
        comp = Computer(othello_alpha.computerStone, othello_alpha.playerStone)
        self.clear_widgets()
        self.add_widget(pw)
コードの解説
kvファイルの55行目~62行目の「Label」は、手番を表示するためのものです。pythonファイルから呼び出すためidの設定と、その他所設定を行っています。
pythonコードの19行目、25行目は、手番をプレイヤーからコンピュータに変更しています。
33行目は、手番をコンピュータからプレイヤーに変更しています。
36、37行目は、勝利判定を手番のLabelに代入しています。
56行目は、先手の手番をLabelに代入しています。
kvファイルのLabelを呼び出す方法は、得点板で解説した方法と同じです。
動作確認
正しく手番が表示されるか、動作確認を行います。コマンドプロンプトを開き、othello_gamma.pyを保存したフォルダまで移動します。
移動したら以下のコマンドを入力し、アプリケーションを実行します。
python othello_gamma.py
先手を選択したとき、プレイ画面の手番が以下のように表示させることを確認します。また、オセロを進めるごとに手番が更新されることも確認します。
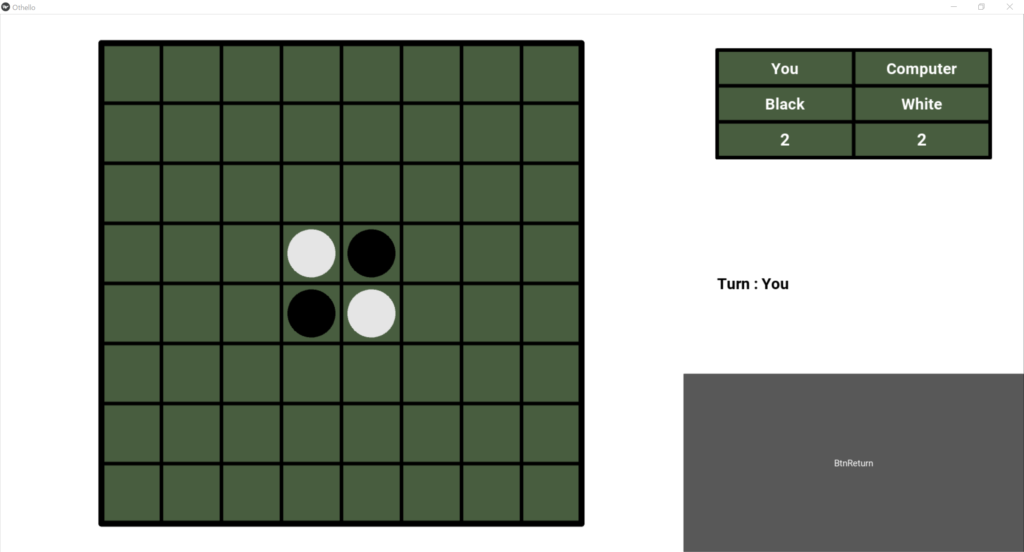
以上で動作確認は完了です。
タイトルの戻るボタン

タイトル画面に戻るためのボダンです。また、盤面を初期値に戻します。othello_beta.pyでは、BtnReturnとして表現していました。
盤面を初期値に戻す関数のソースコードです。othello_gamma.pyに以下のコードを追記します。
# 上記省略

class RootWidget(FloatLayout):
    def gotoTitle(self):
        self.clear_widgets()
        self.add_widget(Factory.TitleWidget())
    def gotoSelectTurn(self):
        self.clear_widgets()
        self.add_widget(Factory.SelectTurn())
    def gotoPlayDisplay(self):
        pw = Factory.PlayWidget()
        pw.ids.clb.text = '2'
        pw.ids.clw.text = '2'
        pw.ids.BlackTurn.text = 'You' if(othello_alpha.playerStone == 1) else 'Computer'
        pw.ids.WhiteTurn.text = 'You' if(othello_alpha.playerStone == 2) else 'Computer'
        pw.ids.TurnLabel.text = 'Turn : ' + pw.ids.BlackTurn.text
        global player
        global comp
        player = Player(othello_alpha.playerStone, othello_alpha.computerStone)
        comp = Computer(othello_alpha.computerStone, othello_alpha.playerStone)
        self.clear_widgets()
        self.add_widget(pw)
    def setField(self):
        othello_alpha.field = setField()
    pass
タイトルに戻るボタンのレイアウトのソースコードです。othello_gamma.kvに以下のコードを追記します。
# 上記省略

<PlayWidget@BoxLayout>:
    AnchorLayout:
        # 省略
        FieldWidget:
            # 省略
    BoxLayout:
        # 省略
        AnchorLayout:
            # 省略
            GridLayout:
                # 省略
        Label:
            # 省略
        AnchorLayout:
            anchor_x: 'center'
            anchor_y: 'center'
            Button: # return Button
                canvas.after:
                    Color:
                        rgb: [0, 0, 0]
                    Line:
                        rectangle: [self.x, self.y, self.width, self.height]
                        width: 3
                background_color: [0.281, 0.363, 0.246, 1]
                background_normal: ''
                color: [1, 1, 1, 1]
                font_size: 36
                size_hint: [0.8, 0.2]
                text: 'Return'
                on_press: app.root.setField(), app.root.gotoTitle()
コードの解説
pythonコードの23、24行目の「setField」は、盤面を初期値に戻すための関数です。
kvファイルの16行目~32行目は、タイトルへ戻るためのボタンを表示するレイアウトです。
16行目~18行目の「AnchorLayout」は、ボタンを真ん中に表示するためのものです。そのため、「anchor_x」と「anchor_y」は「center」に設定しています。
20行目~25行目は、ボタンの周りに線を描画するためのものです。
26行目~32行目は、ボタンの諸設定です。
32行目の「on_press」は、ボタンが押されたときの処理を設定しています。
「app.root.setField()」は、実行中のアプリの一番基礎となるクラスのsetFieldを指しています。つまり、RootWidgetのsetFieldを指します。
「app.root.gotoTitle()」は、実行中のアプリの一番基礎となるクラスのgotoTitleを指します。つまり、RootWidgetのgotoTitleを指します。
動作確認
タイトルへ戻るボタンが正しく表示されるか、動作確認を行います。コマンドプロンプトを開き、othello_gamma.pyを保存したフォルダまで移動します。
移動したら以下のコマンドを入力し、アプリケーションを実行します。
python othello_gamma.py
以下のように表示されることを確認します。また、オセロを進めた後にタイトルへ戻り、さらにプレイ画面に戻ってきたとき、盤面が初期値になっているか確認します。
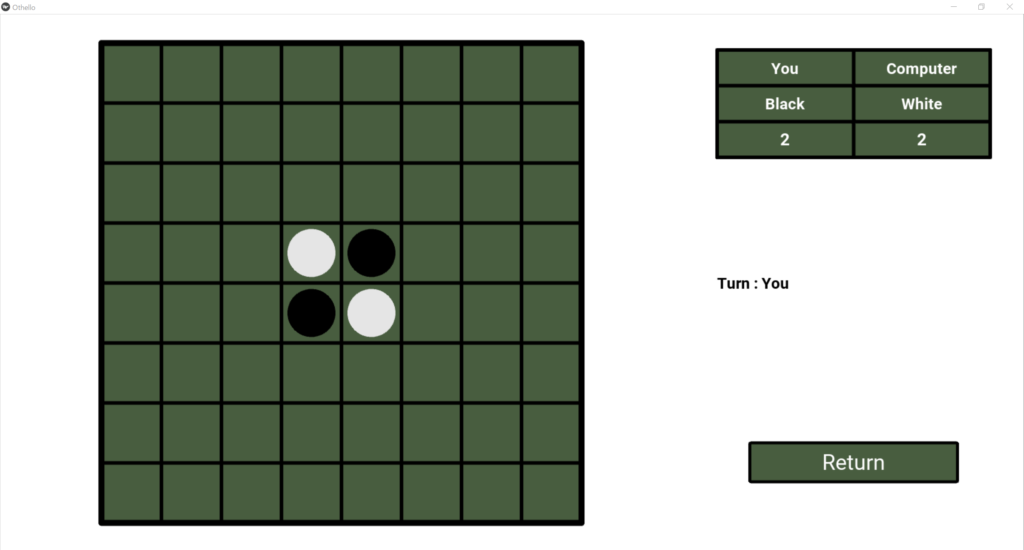
以上で動作確認は完了です。
スポンサードサーチ
まとめ
今回は、Kivy Languageを使用したオセロアプリケーションを完成させました。
Kivy Languageを使わずにアプリケーションを作成するより、pythonコードを短くすることができたと思います。
kvファイルからクラスを呼び出すときは、Factoryまたはidを使用します。
以下に本記事で使用したコードを示します。
理解できなかった箇所がある場合は、メールかTwitterのDMまで連絡お願いいたします。
また、何か作って欲しいというリクエストがある方もメールかTwitterのDMまで連絡お願いいたします。
最後までお読みいただきありがとうございます。
スポンサードサーチ
