【Python】自由落下ゲーム開発(スイカゲーム風) Part2
こんにちは、にわこまです!
今回は、色と大きさの違う11種類のボールとフィールドを作成します。
本記事で使用するソースコードを以下に示します。
何か分からない点がございましたらご連絡お願いいたします!
メールまたはTwitterのDMまで!
スポンサードサーチ
色と大きさ違いのボールの作成

自由落下させるボールの種類を11種にするため、色と大きさ違いのボールを作成します。
コードの提示
11種のボールのソースコードを以下に示します。
import pygame
import pymunk
import random

# 省略

BLACK = (0, 0, 0)
WHEAT = (245, 222, 179)

color_01 = (255,   0,   0)
color_02 = (255, 100, 100)
color_03 = (100,   0, 150)
color_04 = (255, 150,   0)
color_05 = (255, 100,   0)
color_06 = (255,   0,   0)
color_07 = (255, 255, 150)
color_08 = (255, 200, 200)
color_09 = (255, 200,   0)
color_10 = (100, 200,  50)
color_11 = (  0, 150,   0)

radius_01 = 10
radius_02 = 15
radius_03 = 20
radius_04 = 25
radius_05 = 30
radius_06 = 35
radius_07 = 40
radius_08 = 45
radius_09 = 50
radius_10 = 55
radius_11 = 60


def convert_cordinates(point):
    return point[0], disp_size[1]-point[1]

class Ball(object):
    def __init__(self, x, y, color, radius, mass, collision_type):
        # 省略
    def draw(self):
        # 省略

class Ball01(Ball):
    def __init__(self, x, y):
        super().__init__(x, y, color_01, radius_01, 10, 1)
        pass

class Ball02(Ball):
    def __init__(self, x, y):
        super().__init__(x, y, color_02, radius_02, 15, 2)
        pass

class Ball03(Ball):
    def __init__(self, x, y):
        super().__init__(x, y, color_03, radius_03, 20, 3)
        pass

class Ball04(Ball):
    def __init__(self, x, y):
        super().__init__(x, y, color_04, radius_04, 25, 4)
        pass

class Ball05(Ball):
    def __init__(self, x, y):
        super().__init__(x, y, color_05, radius_05, 30, 5)
        pass

class Ball06(Ball):
    def __init__(self, x, y):
        super().__init__(x, y, color_06, radius_06, 35, 6)
        pass

class Ball07(Ball):
    def __init__(self, x, y):
        super().__init__(x, y, color_07, radius_07, 40, 7)
        pass

class Ball08(Ball):
    def __init__(self, x, y):
        super().__init__(x, y, color_08, radius_08, 45, 8)
        pass

class Ball09(Ball):
    def __init__(self, x, y):
        super().__init__(x, y, color_09, radius_09, 50, 9)
        pass

class Ball10(Ball):
    def __init__(self, x, y):
        super().__init__(x, y, color_10, radius_10, 55, 10)
        pass

class Ball11(Ball):
    def __init__(self, x, y):
        super().__init__(x, y, color_11, radius_11, 60, 11)
        pass


def game():
    # Ball
    balls = []

    # Game Start
    while(True):
        for event in pygame.event.get():
            if(event.type == pygame.QUIT):
                return
            if(event.type == pygame.MOUSEBUTTONDOWN):
                x, y = convert_cordinates(event.pos)
                r = random.randint(1, 11)
                if(r == 1):
                    ball = Ball01(x, y)
                elif(r == 2):
                    ball = Ball02(x, y)
                elif(r == 3):
                    ball = Ball03(x, y)
                elif(r == 4):
                    ball = Ball04(x, y)
                elif(r == 5):
                    ball = Ball05(x, y)
                elif(r == 6):
                    ball = Ball06(x, y)
                elif(r == 7):
                    ball = Ball07(x, y)
                elif(r == 8):
                    ball = Ball08(x, y)
                elif(r == 9):
                    ball = Ball09(x, y)
                elif(r == 10):
                    ball = Ball10(x, y)
                elif(r == 11):
                    ball = Ball11(x, y)
                balls.append(ball)
        # Fiil background
        display.fill(WHEAT)

        # Draw Ball
        for ball in balls:
            ball.draw()

        # Display Update
        pygame.display.update()
        clock.tick(FPS)
        space.step(1/FPS)


game()
pygame.quit()
コードの解説
10行目から20行目は各ボールで使用する色を定義しています。
22行目から32行目は各ボールで使用する半径を定義しています。
44行目から47行目の「Ball01クラス」は一番小さいボールクラスを定義しています。Part1で作成したBallクラスを継承しています。
45行目のinit関数の引数はx座標とy座標のみです。
46行目では親クラスのinit関数を実行しています。引数にはx座標、y座標、色、半径、重さ、コリジョンタイプを設定しています。色と半径においては上記で設定した値を設定します。重さは適当です。コリジョンタイプは他のボールと被らないようにします。
49行目から97行目は「Ball01クラス」と同じ作りです。色と大きさ違いのボールを11個定義しています。
111行目から134行目はクリックされた座標にランダムでボールを表示する処理を定義しています。
動作確認

動作確認を実施します。
コードを保存し、コマンドプロンプトを開きます。コードを保存したフォルダまで移動し、以下のコマンドを実行します。
python free_fall_game_part2_1.py
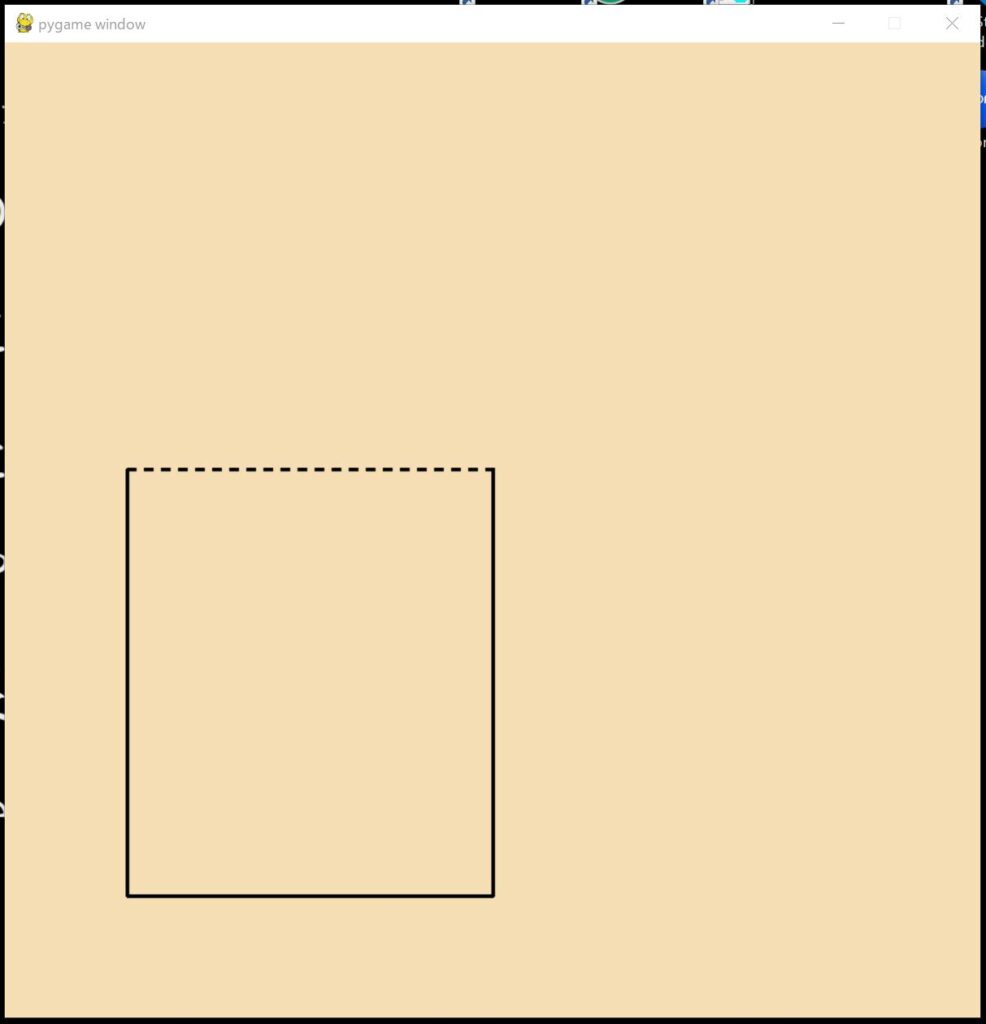
以下のように小麦色の画面が表示されることを確認します。
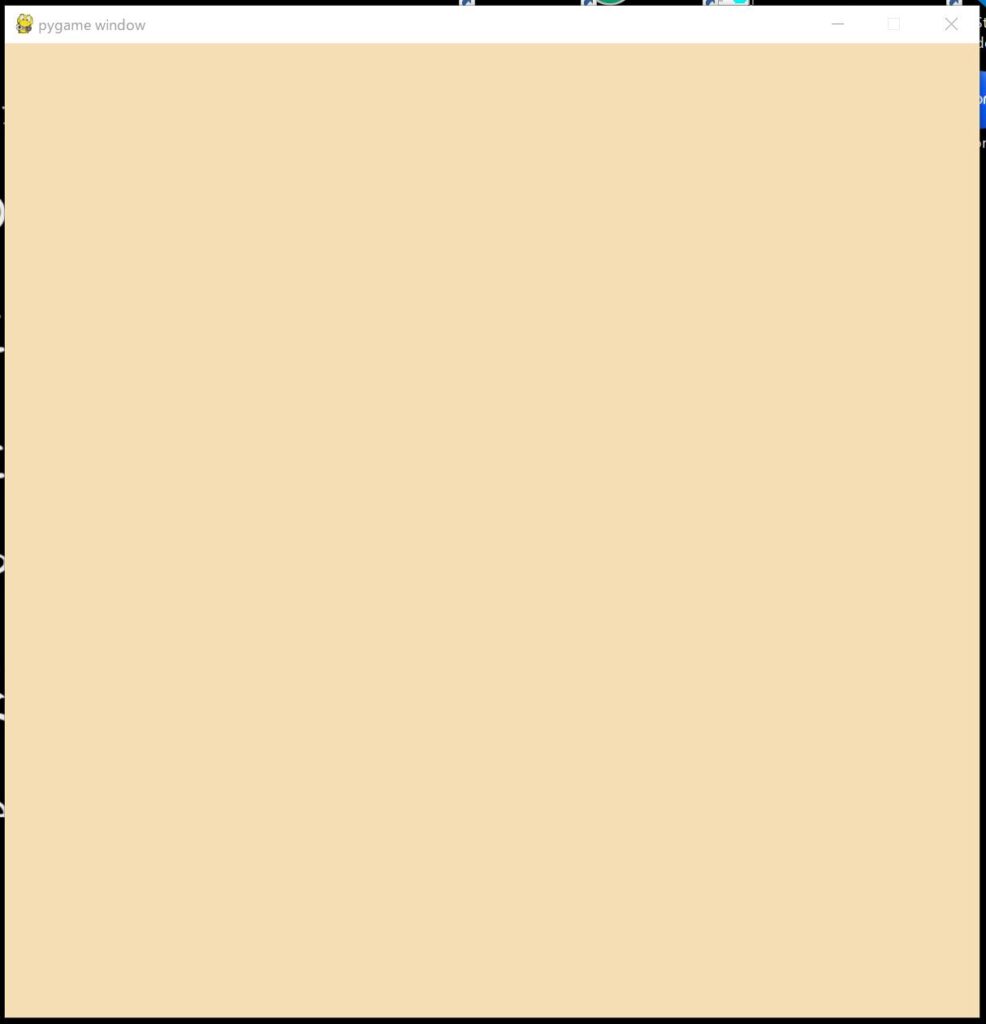
さらに画面上を適当にクリックし、各ボールが表示されることを確認します。
スポンサードサーチ
フィールドの作成
ボールを落下させたり、衝突させたり、合体させるための任意の範囲を作成します。
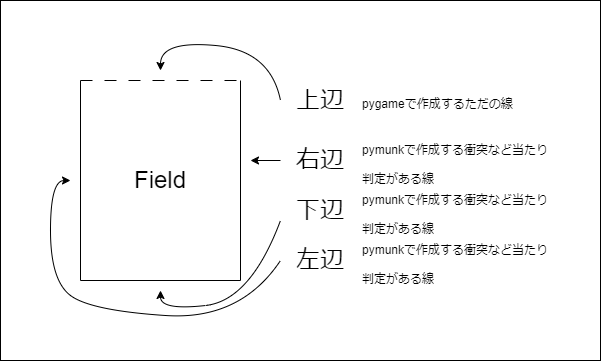
フィールドは大きく分けて、上辺、右辺、下辺、左辺の4つに分けられます。
上辺はただの線です。
右辺、下辺、左辺はpymunkによって作成される線です。
コードの提示
フィールドのソースコードを以下に示します
import pygame
import pymunk
import random

# 省略

class Field():
    def __init__(self, tlx, tly, brx, bry):
        self.tlx = tlx
        self.tly = tly
        self.brx = brx
        self.bry = bry
        self.edge = int(brx - tlx)
        self.step = 7
        self.width = 3
        # Start and Stop
        self.rl_start, self.rl_stop = (brx, tly), (brx, bry)
        self.bl_start, self.bl_stop = (tlx, bry), (brx, bry)
        self.ll_start, self.ll_stop = (tlx, tly), (tlx, bry)
        # Create Line
        self.create_line(self.rl_start, self.rl_stop)  # Right
        self.create_line(self.bl_start, self.bl_stop)  # Bottom
        self.create_line(self.ll_start, self.ll_stop)  # Left
    def draw(self):
        # Top Line
        for i in range(0, self.edge, self.step):
            if(i % (self.step * 2) == 0):
                pygame.draw.line(
                    display,
                    BLACK,
                    convert_cordinates((self.tlx+i, self.tly)),
                    convert_cordinates((self.tlx+i+self.step, self.tly)),
                    self.width
                )
        # Right Line
        pygame.draw.line(
            display,
            BLACK,
            convert_cordinates(self.rl_start),
            convert_cordinates(self.rl_stop),
            self.width
        )
        # Bottom Line
        pygame.draw.line(
            display,
            BLACK,
            convert_cordinates(self.bl_start),
            convert_cordinates(self.bl_stop),
            self.width
        )
        # Left Line
        pygame.draw.line(
            display,
            BLACK,
            convert_cordinates(self.ll_start),
            convert_cordinates(self.ll_stop),
            self.width
        )
    def create_line(self, start, stop):
        body = pymunk.Body(body_type=pymunk.Body.STATIC)
        shape = pymunk.Segment(body, start, stop, self.width)
        shape.elasticity = 0.75
        shape.friction = 0.9
        space.add(shape, body)


def game():
    # Field
    tlx, tly = 100, 450
    brx, bry = 400, 100
    field = Field(tlx, tly, brx, bry)

    # Ball
    balls = []

    # Game Start
    while(True):
        for event in pygame.event.get():
            # 省略
        # Fiil background
        display.fill(WHEAT)

        # Draw Field
        field.draw()

        # Draw Ball
        for ball in balls:
            ball.draw()

        # Display Update
        pygame.display.update()
        clock.tick(FPS)
        space.step(1/FPS)


game()
pygame.quit()
コードの解説
7行目から64行目はボールを落下させるフィールドを定義しています。
8行目から23行目の「init関数」はフィールドを作成しています。引数はフィールドの左上と右下のそれぞれx座標とy座標です。
17行目から19行目はそれぞれ右辺、下辺、左辺の線の開始座標と終了座標を算出しています。
21行目から23行目は後述する「create_line関数」を用いてボールを跳ね返すような線を作成しています。
24行目から58行目の「draw関数」はフィールドを表示する関数です。上辺、右辺、下辺、左辺の順に表示しています。
59行目から64行目の「create_line関数」はボールを跳ね返すような線を作成する関数です。
60行目では重力の影響を受けないオブジェクトを作成しています。body_typeをSTATICにすることにより、一定の箇所に表示させることができます。ボールのように下方向に落ちないようにしています。
61行目では線形のオブジェクトを作成しています。
62行目ではフィールドの弾性率を設定しています。
63行目ではフィールドの摩擦係数を設定しています。
64行目では作成したオブジェクトを自由落下用の画面オブジェクトに追加しています。自由落下空間に物体を追加したイメージです。
69行目から71行目では画面に表示するフィールドを作成しています。
84行目ではフィールドを表示しています。
動作確認
動作確認を実施します。
コードを保存し、コマンドプロンプトを開きます。コードを保存したフォルダまで移動し、以下のコマンドを実行します。
python free_fall_game_part2_2.py
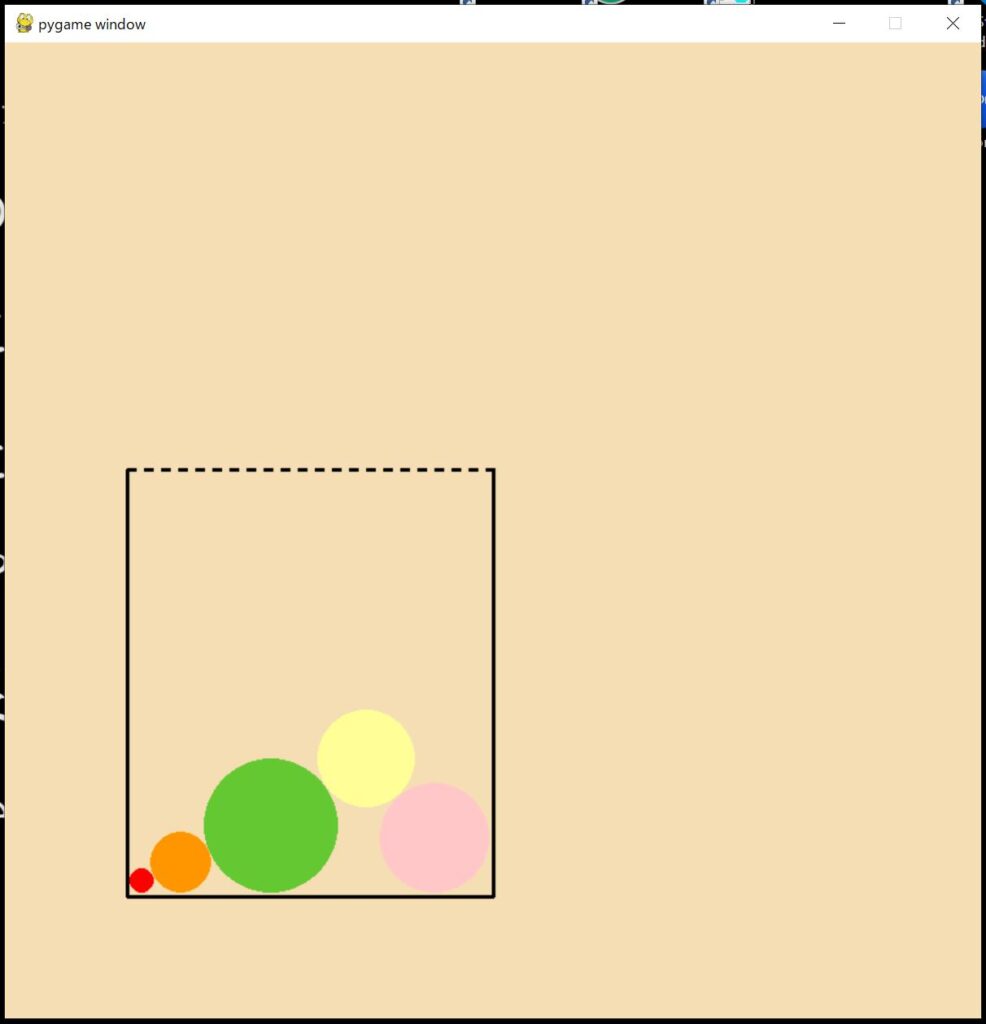
以下のように小麦色の画面にフィールドが表示されることを確認します。
フィールド内でボールが跳ね返ることを確認します。
スポンサードサーチ
まとめ
今回は、11種類のボールを作成しました。またフィールドを作成しボールが跳ね返ることを確認しました。
次回Part3では、ボール同士の衝突判定とサンプルボールを作成します。
自由落下ゲーム開発の目次はこちら
本記事で使用したソースコードを以下に示します。
最後までお読みいただきありがとうございます。
参考
・pygameの公式ドキュメントはこちら
・pymunkの公式ドキュメントはこちら
・pymunkのチュートリアルを説明しているYoutubeはこちら
・カラーコード 原色大辞典はこちら
・カラーコード 色検索はこちら
スポンサードサーチ
