【Python】自由落下ゲーム開発(スイカゲーム風) Part5
こんにちは、にわこまです!
今回は、CurrentCircleのボールを落下させる処理とテキストの表示処理を作成します。
本記事で使用するソースコードを以下に示します。
何か分からない点がございましたらご連絡お願いいたします!
メールまたはTwitterのDMまで!
スポンサードサーチ
ボール落下処理の作成

ボールを落下させる処理の流れは以下の通りです。
1.下矢印キーを押下される
2.CurrentCircleをボールに変換する
3.NextCircleをCurrentCircleに変換する
4.NextCircleを更新する
コードの提示
ボール落下処理のソースコードを以下に示します。
import math
import pygame
import pymunk
import random

# 省略

class Circle(object):
    # 省略

class CurrentCircle(Circle):
    def __init__(self, x, y, color, radius, start, stop):
        super().__init__(x, y, color, radius)
        self.dist = 2
        self.start = start
        self.stop = stop
    def handle_keys(self):
        key = pygame.key.get_pressed()
        if(key[pygame.K_LEFT] and (self.x - self.dist) >= self.start):
            self.x -= self.dist
        if(key[pygame.K_RIGHT] and (self.x + self.dist) <= self.stop):
            self.x += self.dist
    def get_ball(self):
        if(self.radius == radius_01):
            ball = Ball01(self.x, self.y)
        elif(self.radius == radius_02):
            ball = Ball02(self.x, self.y)
        elif(self.radius == radius_03):
            ball = Ball03(self.x, self.y)
        elif(self.radius == radius_04):
            ball = Ball04(self.x, self.y)
        elif(self.radius == radius_05):
            ball = Ball05(self.x, self.y)
        return ball

class NextCircle(Circle):
    # 省略


def game():

    # 省略

    # Game Start
    while(True):
        for event in pygame.event.get():
            if(event.type == pygame.QUIT):
                return
            if(pygame.key.get_pressed()[pygame.K_DOWN]):
                # Drop Current Circle
                balls.append(current_circle.get_ball())
                # Update Current Circle
                current_circle.color = next_circle.color
                current_circle.radius = next_circle.radius
                # Update Next Circle
                next_circle.update()
        # Fiil background
        display.fill(WHEAT)

        # Draw Field
        field.draw()

        # Draw Ball
        for ball in balls:
            ball.draw()

        # Draw Sample Ball
        for ball in sample_circles:
            ball.draw()

        # Draw Current Circle
        current_circle.draw()
        current_circle.handle_keys()

        # Draw Next Circle
        next_circle.draw()

        # Display Update
        pygame.display.update()
        clock.tick(FPS)
        space.step(1/FPS)


game()
pygame.quit()
コードの解説
23行目から34行目の「get_ball関数」はCurrentCircleの半径に該当するボールを作成する関数です。
半径がradius_01の場合はBall01を作成します。
半径がradius_02の場合はBall02を作成します。
半径がradius_03の場合はBall03を作成します。
半径がradius_04の場合はBall04を作成します。
半径がradius_05の場合はBall05を作成します。
49行目から56行目ではボールの落下処理を実行しています。
49行目の「if文」では下矢印キーが押下されたか判定しています。
51行目では先述したget_ball関数で取得したボールをballsに追加しています。
53行目と54行目ではCurrentCircleの色と半径をNextCircleの色と半径で更新しています。
56行目ではNextCircleを更新しています。
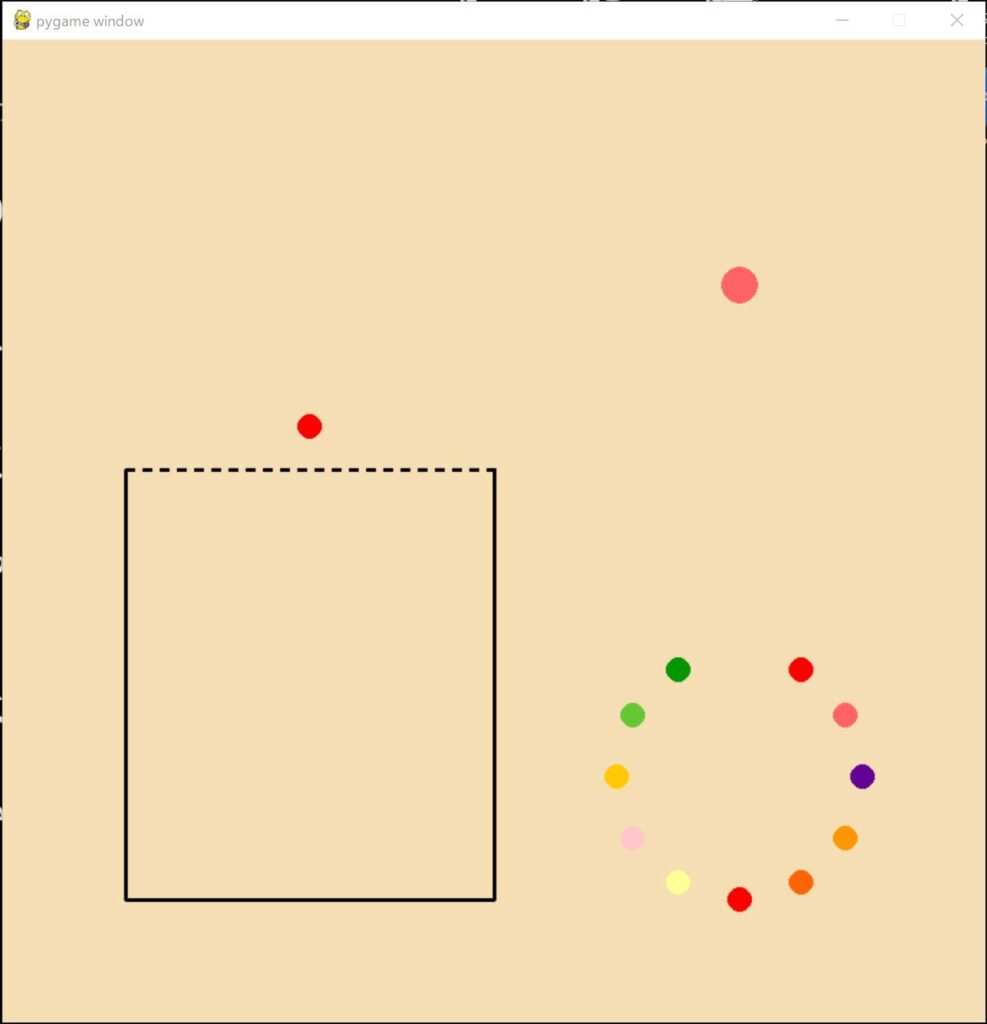
動作確認

動作確認を実施します。
コードを保存し、コマンドプロンプトを開きます。コードを保存したフォルダまで移動し、以下のコマンドを実行します。
python free_fall_game_part5_1.py
以下の動作を確認します
・フィールド上のボールが落下すること
・フィールド上のボールが画面右上のボールで更新されること
・画面右上のボールが更新されること
スポンサードサーチ
テキスト表示処理の作成

表示させるテキストは2つあります。
1つ目は画面右上に表示しているボール上に「Next」というテキストを表示します。
2つ目はフィールド上にスコアを表示します。スコアの計算はPart3の衝突判定で実施していますので、その値を使用します。
コードの提示
テキスト表示処理のソースコードを以下に示します。
import math
import pygame
import pymunk
import random

# 省略

def game():

    # 省略

    # Common Font
    font = pygame.font.SysFont(None, 50)
    # Next Text
    next_text = font.render("Next", True, BLACK)
    next_rect = next_text.get_rect(
        midbottom=convert_cordinates((cx, cx+radius_06))
    )

    # Game Start
    while(True):
        for event in pygame.event.get():
            if(event.type == pygame.QUIT):
                return
            if(pygame.key.get_pressed()[pygame.K_DOWN]):
                # Drop Current Circle
                balls.append(current_circle.get_ball())
                # Update Current Circle
                current_circle.color = next_circle.color
                current_circle.radius = next_circle.radius
                # Update Next Circle
                next_circle.update()
        # Fiil background
        display.fill(WHEAT)

        # Draw Field
        field.draw()

        # Draw Ball
        for ball in balls:
            ball.draw()

        # Draw Sample Ball
        for ball in sample_circles:
            ball.draw()

        # Draw Current Circle
        current_circle.draw()
        current_circle.handle_keys()

        # Draw Next Circle
        next_circle.draw()

        # Draw Next Text
        display.blit(next_text, next_rect)

        # Draw Score Text
        score_text = font.render("Score: {:,}".format(handler.data["score"]), True, BLACK)
        score_rect = score_text.get_rect(
            bottomleft=convert_cordinates((tlx, cx+radius_06))
        )
        display.blit(score_text, score_rect)

        # Display Update
        pygame.display.update()
        clock.tick(FPS)
        space.step(1/FPS)


game()
pygame.quit()
コードの解説
13行目では表示するテキストのフォントを定義しています。第1引数にフォント名、第2引数にフォントサイズを設定します。フォント名がNoneの場合はpygameのデフォルトフォントが設定されます。
15行目では表示するテキストを定義しています。第1引数にテキスト、第2引数にアンチエイリアスの有無、第3引数にテキストの色を設定します。ここでは第1引数に「Next」、第2引数にTrueつまりアンチエイリアスあり、第3引数に黒を設定しています。
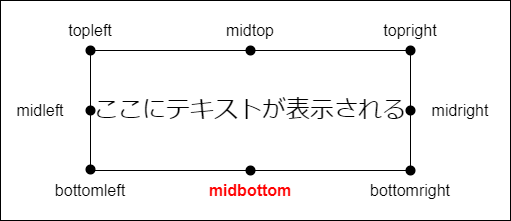
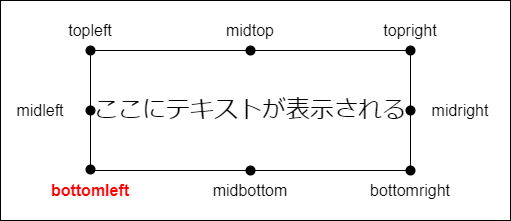
16行目から18行目ではテキストの表示位置を設定しています。midbottomを基準として表示位置を設定しています。
55行目では「Next」テキストを表示しています。
58行目では表示するテキストを定義しています。第1引数にテキスト、第2引数にアンチエイリアスの有無、第3引数にテキストの色を設定します。
ここでは第1引数にhandler.data[“score”]から取得したスコアを「Score: x,xxx」の形式で設定しています。
59行目から61行目ではテキストの表示位置を設定しています。bottomleftを基準として表示位置を設定しています。
62行目では「Score: x,xxx」テキストを表示しています。
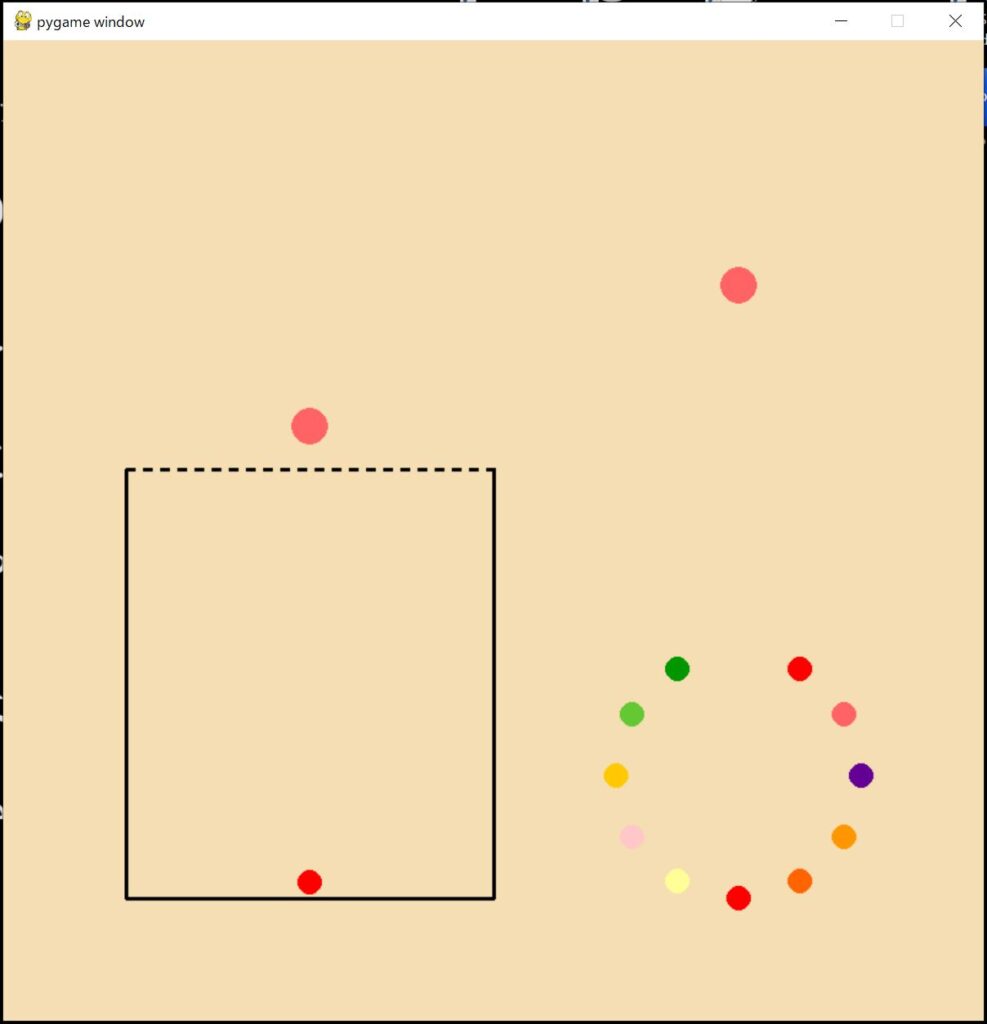
動作確認
動作確認を実施します。
コードを保存し、コマンドプロンプトを開きます。コードを保存したフォルダまで移動し、以下のコマンドを実行します。
python free_fall_game_part5_2.py
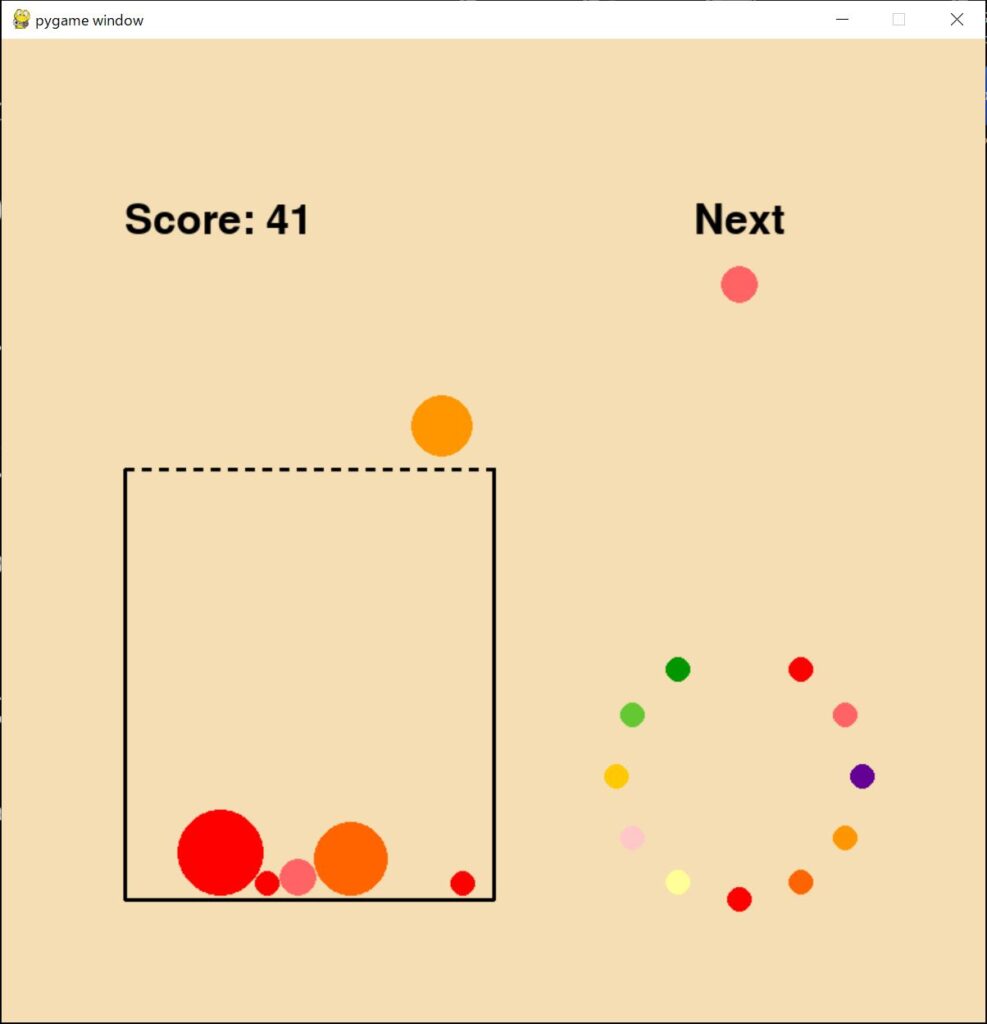
以下のように画面右上のボール上に「Next」が表示されていることを確認します。またフィールド上にスコアが表示されていることを確認します。
スポンサードサーチ
まとめ
今回は、ボールを落下させる処理とテキストの表示処理を作成しました。
次回Part6では、終了判定とGame Overテキストの表示処理を作成します。
自由落下ゲーム開発の目次はこちら
本記事で使用したソースコードを以下に示します。
最後までお読みいただきありがとうございます。
参考
・pygameの公式ドキュメントはこちら
・pymunkの公式ドキュメントはこちら
・pymunkのチュートリアルを説明しているYoutubeはこちら
・カラーコード 原色大辞典はこちら
・カラーコード 色検索はこちら
スポンサードサーチ
